You leave the house Tuesday morning. Everything starts fine. You head to work, grab coffee, run errands.
Wednesday night you return and turn the key. Nothing happens. Just a lonely click or a slow, groaning crank.
That is the classic picture of battery dies after sitting for a week. It frustrates people because the fix is not always obvious. Sometimes it is a simple parasitic drain.
Sometimes it is an aging battery past its prime. Sometimes the alternator never fully recharged the cell to begin with.
Understanding why this happens stops the guesswork. A healthy lead-acid car battery self-discharges roughly 3 to 5 percent every month at moderate temperatures. Modern vehicles add 20 to 50 milliamps of parasitic draw even when locked and asleep.
Combine those two factors with short trips that never let the alternator top off the charge, and you can watch a fully charged battery drop below starting voltage in just seven days. Per SAE J537 testing protocols used by battery manufacturers, starting batteries are rated for a specific reserve capacity under controlled conditions. Real-world parking changes those conditions entirely.
The good news is that diagnosing the root cause follows a clear decision path, and you can walk it yourself with a basic multimeter and about twenty minutes of your time.
Quick Answer
A battery dies after sitting for a week when electrical drain exceeds the battery's ability to hold charge. Common causes include parasitic drain from aftermarket devices, an aging battery losing capacity, or a weak alternator. Testing resting voltage first isolates the issue quickly.
A multimeter reading below 12.2 volts signals a discharge problem. Checking parasitic draw next identifies abnormal current leaks. Most fixes cost under $100 when caught early.
Why Your Car Battery Dies After Sitting Overnight
The phenomenon sounds simple but hides several overlapping mechanisms. Your car battery is not a capacitor that holds electricity indefinitely. It is a chemical storage device with plates submerged in sulfuric acid electrolyte.
Over time, those chemicals degrade naturally. Every charge and discharge cycle causes microscopic lead sulfate crystals to form on the plates. Normally the alternator reverses that process during driving.
But short trips do not give the system enough time to complete the reversal. Sulfate crystals grow larger and harder to dissolve. Capacity drops.
The battery can no longer deliver the current a starter motor demands.

Modern vehicles complicate the picture further. Manufacturers added dozens of electronic control modules for safety, comfort, and telematics. These modules never truly power down.
They enter a low-power sleep mode between uses. That sleep mode still draws current. Radio memory, keyless entry receivers, engine control unit retainers, and alarm systems all pull small amounts of power continuously.
Most OEM designs keep this baseline draw within acceptable limits. Aftermarket installations frequently break that balance. An improperly wired alarm system, a dash cam left recording in parked mode, or an added subwoofer with a remote turn-on circuit that never sleeps can each add enough drain to kill a marginally charged battery over several days.
Temperature plays a major role too. Cold weather thickens engine oil, raising the cranking resistance your starter must overcome. At the same time, cold slows the chemical reactions inside the battery, reducing available current.
A battery rated at 600 cold cranking amps at 32 degrees Fahrenheit may deliver closer to 400 amps at zero degrees. Heat accelerates internal corrosion and evaporates electrolyte in flooded batteries. Either extreme shortens lifespan and makes a weekly sit far more likely to end in a no-start.
If you have noticed dimming headlights or slow cranking before the final failure, that pattern matches the warning signs of battery degradation well. Those early clues give you a window to act before complete abandonment.
The self-discharge rate also depends on battery type. Flooded lead-acid batteries lose charge faster than AGM or EFB designs. AGM batteries typically self-discharge at only 1 to 2 percent per month because their glass mat separators reduce internal resistance and slow chemical breakdown.
If you own a stop-start vehicle with an EFB or AGM battery, you may survive longer parking periods than a conventional flooded setup. Still, parasitic drain and alternator issues affect every chemistry equally. Understanding which factor dominates your situation determines whether you need a charger, a repair, or simply a driving habit change.
The Short Answer: Three Likely Culprits
When a battery dies after sitting, three causes account for the vast majority of cases. Pinpointing which one applies saves money and time. Each cause has a distinct signature you can identify with basic tools.
Parasitic Drain
Parasitic drain occurs when something draws current from the battery while the vehicle is off. Normal systems draw between 20 and 50 milliamps. Anything above 50 milliamps usually indicates a fault.
Common sources include:
- Aftermarket alarms, trackers, or stereo systems wired incorrectly
- Glove box, trunk, or dome lights stuck in the on position
- Faulty modules that fail to enter sleep mode
- Relays that remain energized due to internal welding or control circuit failures
- Trunk light switches damaged by wear or debris
Diagnosing parasitic drain requires disconnecting the negative terminal and measuring current flow through a multimeter set to amps. Pulling fuses one at a time reveals which circuit holds the problem. Once identified, repairing or replacing the faulty component eliminates the leak.
This guide to common battery discharge causes covers additional scenarios beyond the typical three.
Weak or Aged Battery
Batteries degrade over time. The average service life falls between three and five years, depending on climate, usage patterns, and maintenance. Repeated deep discharges accelerate sulfation.
Partial charges prevent full recovery. Heat baking the battery under the hood daily shortens plate life. A battery that tests below 70 percent of its rated capacity during a load test should be replaced.
No amount of charging restores degraded plates. The chemical damage is permanent.
Faulty Charging System
The alternator recharges the battery while the engine runs. If it fails, the battery drains through normal use and never recovers. Symptoms include dimming lights under load, a battery warning light on the dashboard, or a battery that consistently dies despite being relatively new.
Testing alternator output involves measuring voltage at the battery terminals with the engine running. Healthy output sits between 13.8 and 14.4 volts. Values outside that range indicate a regulator, diode, or belt problem.
A weak alternator will destroy even a fresh battery if driven repeatedly.
Identifying which culprit applies starts with the resting voltage test described in the next section. Each branch of the decision tree directs you toward a specific follow-up procedure. Skipping ahead to part replacement without testing leads to repeated failures and wasted expense.
How a Car Battery Actually Holds Charge
Understanding battery chemistry makes diagnosis intuitive instead of trial-and-error. A conventional lead-acid starting battery contains six cells connected in series. Each cell produces approximately 2.1 volts.
Together they deliver the 12.6 volts labeled on the casing. Inside each cell, alternating plates of lead dioxide and spongy lead sit immersed in sulfuric acid electrolyte. The specific gravity of that acid determines state of charge.
Fully charged electrolyte measures about 1.265 specific gravity. Discharged electrolyte drops to roughly 1.120.
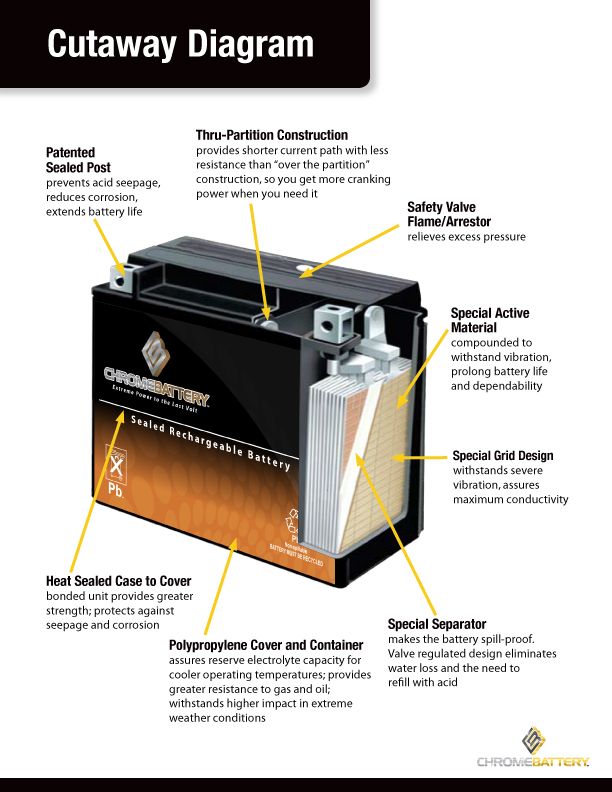
During discharge, sulfuric acid reacts with the plate material to form lead sulfate on both positive and negative plates. This reaction releases electrons that flow through the external circuit to power the starter motor or accessories. The sulfuric acid concentration decreases as the reaction proceeds, which is why specific gravity drops as the battery discharges.
During charging, the alternator reverses the reaction. Lead sulfate converts back to lead dioxide and spongy lead. Sulfuric acid concentration returns to normal.
Full recovery requires sufficient time and adequate current. Short drives below thirty minutes often fail to complete the chemical restoration.
Self-discharge happens naturally because the chemical reactions are not perfectly reversible under open-circuit conditions. Internal micro-short currents between plates and slow chemical recombination gradually consume stored energy. Flooded batteries self-discharge faster because their liquid electrolyte allows greater internal current flow.
AGM batteries trap the electrolyte in fiberglass mats, reducing internal leakage and slowing self-discharge to roughly half the flooded rate.
Voltage serves as a practical proxy for state of charge when measured at rest. Resting voltage stabilizes after the battery has sat for several hours without load or charge input. A fully charged battery reads 12.6 volts or slightly higher.
Each 0.1-volt drop represents roughly a 25 percent decrease in state of charge. At 12.3 volts, the battery holds about 50 percent charge. At 12.0 volts, only 25 percent remains.
Below 11.8 volts, the battery is considered deeply discharged and may suffer permanent damage if left in that state.
This voltage-to-charge relationship is why resting voltage testing works as a first diagnostic step. The number tells you whether the battery lost charge to self-discharge alone or to an external drain pulling current while parked. Knowing this distinction directs you toward the correct branch of the decision tree.
Cold temperatures amplify the effect of low state of charge. Available cranking amps drop proportionally as temperature falls. A battery at 50 percent charge in freezing weather may lack sufficient current to turn a stiff engine.
The same battery at the same charge level in warm weather might still crank reliably. Climate matters enormously when evaluating whether a week of parking will produce a no-start condition.
Your Step-by-Step Diagnostic Decision Tree
This section gives you the branching path to isolate the exact cause. Follow it in order. Each test builds on the previous result.
Skipping steps leads to misdiagnosis and unnecessary part replacement.
Step One: Measure Resting Voltage
Park the vehicle for at least two hours, preferably overnight. Turn off all accessories. Ensure the key fob is away from the car to prevent wake signals from keeping modules active.
Set your multimeter to DC volts. Touch the red probe to the positive terminal and the black probe to the negative terminal. Record the reading.
Compare your result against this reference table:
| Resting Voltage | State of Charge | Probable Cause Category |
|---|---|---|
| 12.6V or above | 100 percent | Healthy battery. Check parasitic drain or alternator. |
| 12.4V to 12.5V | Approximately 75 percent | Moderate discharge. Evaluate driving habits and alternator output. |
| 12.2V to 12.3V | Approximately 50 percent | Significant discharge. Test alternator. Battery may need replacement if age exceeds three years. |
| 12.0V to 12.1V | Approximately 25 percent | Deep discharge. Perform load test. Battery likely needs replacement or smart charger recovery. |
| Below 12.0V | Severely discharged | Battery damaged or severely parasitic drain present. Load test immediately after any charging attempt. |
This voltage snapshot narrows the field dramatically. If your reading lands in the healthy range but the battery still died overnight, parasitic drain becomes the primary suspect. If the reading sits in the discharged range, either the battery cannot hold charge or the charging system failed to replenish it between drives.
Both possibilities require the next diagnostic step.
Step Two: Determine Which Follow-Up Path Applies
Use the voltage result to choose your next action:
- Voltage 12.6V or above: Proceed to the parasitic draw test. The battery held a charge initially. Something drained it while parked.
- Voltage 12.2V to 12.5V: Test alternator output first. Then run a load test on the battery. If alternator output is normal, replace the battery.
- Voltage below 12.0V: Perform a load test immediately. If the battery fails the load test, replace it. If it passes, suspect chronic undercharging from a weak alternator or extremely short driving cycles.
Step Three: Run the Parasitic Draw Test
Only perform this test if Step One showed healthy resting voltage. Disconnect the negative battery cable. Set your multimeter to amps, ideally the 10-amp range.
Connect the meter between the negative battery post and the disconnected cable terminal. The display now shows total current flowing from the battery into the vehicle's electrical system.
Wait thirty to sixty minutes for all modules to enter sleep mode. Some vehicles take longer. SUVs and trucks with larger body control modules may need up to two hours.
Watch the reading stabilize. A stable draw under 50 milliamps indicates normal parasitic load. A drawing above 100 milliamps signals a fault worth investigating.
Once you confirm abnormal drain, pull fuses one at a time while watching the meter. When the draw drops significantly after removing a fuse, you found the problematic circuit. Investigate components on that circuit.
Common targets include aftermarket stereos, alarm systems, trunk lights, and glove compartment lamps. This systematic approach prevents random part swapping.
Step Four: Test Alternator Output
Start the engine. Measure voltage at the battery terminals with the multimeter on DC volts. Note the reading.
Turn on high-draw accessories: headlights on high beam, rear defroster, air conditioning on max, fan on highest setting. Watch the voltage hold steady between 13.8 and 14.4 volts. If it drops below 13.5 volts under load, the alternator cannot sustain output.
Possible causes include worn brushes, failing diodes, a bad voltage regulator, or a loose serpentine belt.
Alternator testing also reveals overcharging conditions. Voltages above 15 volts risk damaging the battery and electronics. If you observe either undercharging or overcharging, have the charging system serviced before installing a new battery.
A new battery subjected to the same charging fault will fail prematurely.
Step Five: Perform a Load Test
Most auto parts stores offer free load testing. Bring the battery in after confirming it holds a reasonable charge. The tester applies a controlled high-current drain for fifteen seconds and measures voltage retention.
A healthy battery should maintain above 9.6 volts during the test. Reading below that threshold indicates reduced capacity. Combined with age information, this result confirms whether replacement is warranted.
Load testing after parasitic drain diagnosis prevents confusion. A battery that passed a load test earlier may fail later if it sat deeply discharged for an extended period. Sulfation from prolonged low state of charge reduces conductive surface area on the plates.
The load test reveals that damage clearly.
Following this sequence in order ensures you address the real problem rather than symptoms. Many drivers skip straight to buying a new battery. If the alternator is the culprit, the replacement fails within months.
If a parasitic drain exists, the new battery dies again on the second day parked. Methodical testing pays for itself immediately.
Check These Four Conditions First
Before running formal diagnostics, evaluate these situational factors. They often explain why one vehicle develops dead batteries while an identical model in the next driveway does not. Condition awareness helps you interpret test results accurately and choose the right corrective action.
Symptom Clues Before Failure
Battery death rarely arrives without warning. Track these indicators if you notice them recurring:
- Headlights appear dimmer than usual at idle, brightening when revved
- Starter motor turns the engine slower than normal during morning starts
- Dashboard electronics reboot or display error messages on startup
- Keyless entry response becomes sluggish or inconsistent
- Battery warning light illuminates briefly during operation
These symptoms point toward charging system weakness or advancing battery degradation. Acting on early signs prevents complete abandonment. Ignoring them until the car won't start guarantees a tow and potentially higher repair costs.
Recognizing the early indicators of battery issues helps you intervene before total failure.
Environment and Climate Exposure
Where you park matters more than most owners realize. Garage parking in mild climates produces the best battery longevity. Outdoor parking in extreme temperatures accelerates deterioration.
Cold climates impose the harshest conditions because low temperatures simultaneously reduce available cranking current and increase engine oil viscosity. A battery losing 40 percent of its cranking capacity to cold faces a much harder task turning over a thick-oiled engine.
Hot climates damage batteries through accelerated grid corrosion and electrolyte loss. Under-hood temperatures can exceed 200 degrees Fahrenheit on sunny days. That heat bakes the battery constantly, even when parked.
Flooded batteries lose water to evaporation under these conditions. AGM batteries resist heat better but still degrade faster than in temperate environments. If you live in a hot region, expect a shorter battery lifespan regardless of driving habits.
Vehicle Age and Electronics Load
Newer vehicles carry more standby electronics than older models did. Every generation adds another module, sensor, or convenience feature that draws power in sleep mode. A 2025 luxury sedan may idle at 60 to 80 milliamps of parasitic draw compared to 30 to 40 milliamps in a 2005 equivalent.
More modules mean more potential failure points. A single malfunctioning Body Control Module can double or triple normal parasitic draw.
Aftermarket modifications compound the problem. Alarm systems, remote starters, tracking devices, and upgraded audio equipment each require power connections. Poorly installed accessories often tap into circuits that stay live after shutdown or fail to return to sleep mode.
Even quality installations add baseline draw. Adding multiple accessories increases cumulative parasitic load. Document any modifications made to the vehicle's electrical system before beginning diagnostic work.
Driving Patterns and Usage Frequency
How you drive determines whether the battery stays charged between uses. Short trips under ten miles prevent full recharge cycles. The starter draws significant current to crank the engine.
The alternator needs time to replenish that energy while also powering accessories and recharging the battery. A fifteen-minute drive at highway speeds typically restores enough charge for the next start. A ten-minute trip through city traffic may only replace a fraction of what the starter consumed.
Frequent short-trip driving creates a chronic undercharge state. The battery never reaches full saturation. Sulfation accumulates gradually.
Capacity erodes faster than nominal aging would predict. Owners of commuter vehicles with predominantly short trips often replace batteries every two to three years instead of the typical four. Extending trip length periodically, even just a twenty-minute highway run, helps restore full charge and slow degradation.
Winter driving patterns worsen the problem further. Cold starts demand more cranking effort. Defrosters and heated seats add electrical load during warm-up.
Fuel injection systems work harder in cold conditions. All of these factors increase energy expenditure during each drive cycle. The net effect is a battery that loses ground faster in winter months and is more vulnerable to death during overnight parking spells.
Recognizing which of these four conditions apply to your situation shapes your expectations and guides your testing priorities. A weekend car parked outdoors in Minnesota faces completely different risks than a daily driver garage-parked in Arizona. Context matters.
The decision tree that follows accounts for these variables by directing you toward the most probable cause based on your specific circumstances.
Branch 1: Resting Voltage Test Results
The resting voltage test gives you the first clear signal about what is happening with your battery. When you measure voltage after the vehicle has been parked for several hours, you see the true state of charge without any charging or load interference. This number tells you whether the battery lost energy to normal self-discharge or to an abnormal drain source.
Interpreting Your Voltage Reading
A multimeter reading above 12.6 volts indicates a healthy, fully charged battery. If your battery shows this voltage yet still dies after sitting, something is pulling current while the car sleeps. Look into parasitic draw testing next.
You can learn more about understanding common battery discharge causes to identify hidden drains.
Voltage between 12.2 and 12.5 volts suggests moderate discharge. This range commonly appears in vehicles driven infrequently or on short trips. The battery survives but operates below optimal charge levels.
Repeated operation in this range accelerates sulfation. Consider extending your driving duration periodically or adding a maintenance charger to keep the battery topped off.
Readings below 12.0 volts signal deep discharge. At this level, the battery likely suffered damage from prolonged low state of charge. Lead sulfate crystals grew large enough to reduce active plate surface area permanently.
Attempt recovery with a smart charger featuring desulfation mode, but expect reduced capacity even after successful recharge. Load testing will reveal whether the battery retains adequate cranking ability.
How Temperature Affects Your Reading
Cold temperatures suppress voltage readings temporarily. A battery sitting in freezing weather may show 12.0 volts when actually holding 75 percent charge. The chemical reactions slow down in cold conditions, reducing voltage output under no-load measurement.
Always allow the battery to reach ambient temperature before interpreting results, or adjust your expectations accordingly.
Heat produces the opposite effect. Warm batteries display slightly elevated voltages compared to their true state of charge. A battery reading 12.4 volts in hot weather may actually sit closer to 50 percent charge.
Factor in your local temperature when evaluating readings taken immediately after parking.
When to Trust the Voltage Test
The resting voltage test works reliably when performed correctly. Ensure your multimeter is calibrated and functioning. Clean any corrosion from terminals before measuring.
Touch probes directly to the terminal posts, not through corroded connectors. Poor contact produces inaccurate readings that mislead diagnosis.
Voltage testing alone cannot distinguish between a weak battery and a parasitic drain. It only tells you the current charge state. Pair voltage results with parasitic draw measurements or alternator output checks to reach a complete diagnosis.
Branch 2: Alternator Performance Check
A faulty alternator mimics battery failure perfectly. The battery dies because it never receives adequate recharge between drives. Replacing the battery without fixing the charging system guarantees another premature failure within months.
Testing Alternator Output Correctly
Start the engine and let it idle. Measure voltage across the battery terminals with your multimeter set to DC volts. A healthy alternator produces between 13.8 and 14.4 volts at idle.
Values outside this range indicate problems requiring attention.
Add electrical load to simulate real driving conditions. Turn on headlights, rear defroster, air conditioning, and radio simultaneously. Watch the voltage remain stable above 13.5 volts under this load.
If voltage drops below 13.5 volts, the alternator cannot sustain output when needed most. The vehicle relies on battery reserve power instead, which explains overnight death after minimal driving.
Recognizing Alternator Failure Signs
Dashboard warning lights often appear before complete failure. The battery indicator illuminates when charging system voltage falls outside normal ranges. Some vehicles trigger this light only under specific conditions, so a dark dashboard does not guarantee proper charging.
Dimming headlights during idle represent another classic sign. As engine RPM drops, alternator output decreases proportionally. Weak alternators show this effect dramatically.
Bright, steady headlights across all RPM ranges suggest healthy charging.
Battery warning lights, dimming lights, and electrical glitches occurring together point strongly toward alternator issues. When these symptoms appear alongside weekly battery death, alternator testing becomes your priority over battery replacement.
Alternator vs Battery: Which Failed First?
Distinguishing alternator failure from battery failure prevents costly mistakes. A bad alternator kills healthy batteries through chronic undercharging. A bad battery fails despite working alternator output.
The resting voltage test helps separate these scenarios.
If resting voltage measures 12.6 volts but drops significantly after starting, the battery holds charge poorly. If resting voltage sits low and stays low even after charging, the alternator may not replenish energy adequately. Running both voltage and load tests clarifies the situation.
Older vehicles with high mileage face higher alternator failure probability. Wear on brushes, diodes, and bearings accumulates over time. Modern vehicles often integrate alternator diagnostics into onboard systems, triggering warning codes before complete failure occurs.
Scanning for stored diagnostic trouble codes provides additional confirmation.
Branch 3: Parasitic Drain Investigation
Parasitic drain hides behind seemingly normal vehicles. Everything shuts off, doors lock, lights go dark. Yet current continues flowing through circuits that should remain dormant.
Over days, this invisible drain empties the battery completely.
Performing the Amp Draw Test Safely
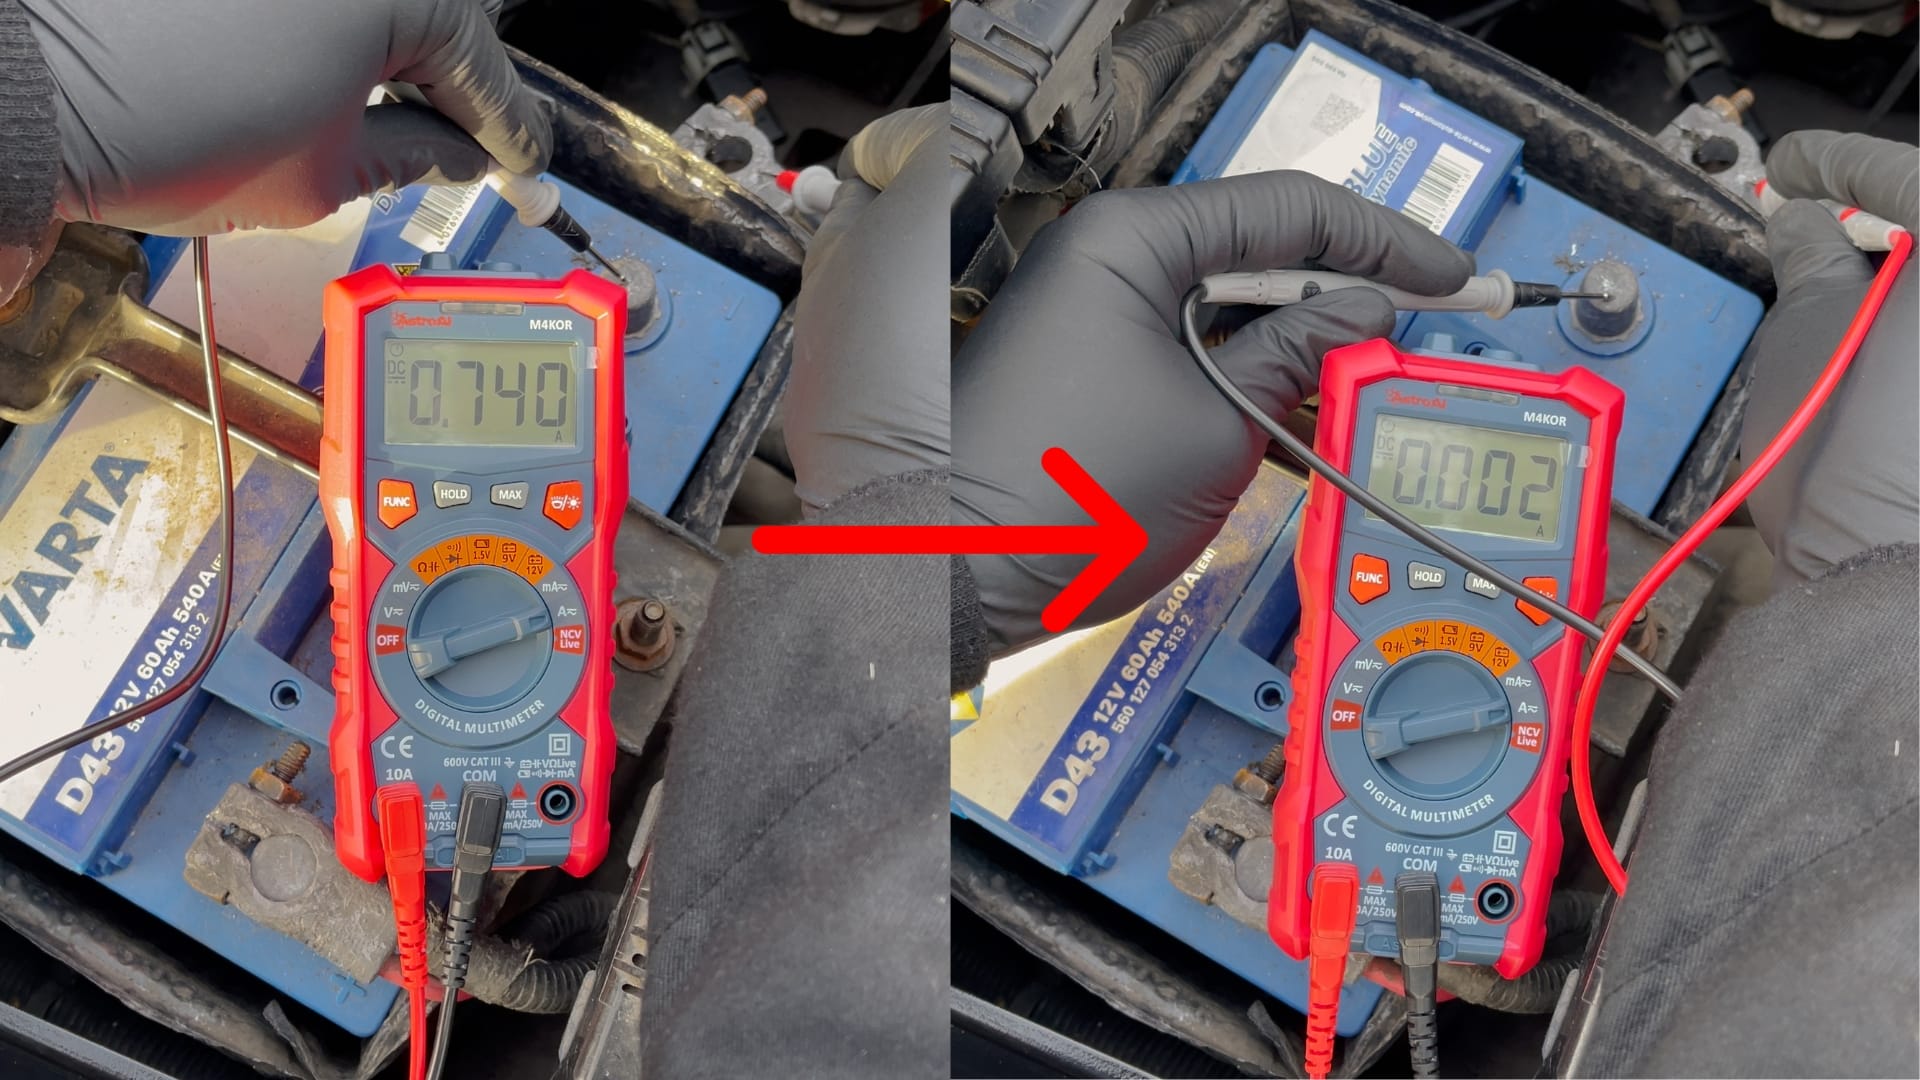
Disconnect the negative battery cable first. Set your multimeter to the 10-amp DC current range. Connect the meter leads between the negative battery post and the detached cable terminal.
The circuit now passes through the meter, displaying total parasitic draw in real time.
Wait thirty to sixty minutes for all control modules to enter sleep mode. During this period, you may watch the reading decline as systems powering down stop drawing current. Some trucks and SUVs require up to two hours for complete sleep transition.
Patience here prevents false high readings.
Identifying Normal vs Abnormal Draw
Most modern vehicles draw between 20 and 50 milliamps in proper sleep mode. Luxury models with extensive telematics may approach 80 milliamps legitimately. Anything exceeding 100 milliamps warrants investigation.
The extra current represents a fault rather than design specification.
Aftermarket installations frequently cause excessive draw. Alarm systems wired directly to constant power without proper relay control add standby current. Dash cams left recording in parking mode drain batteries overnight.
Subwoofer amplifiers with remote turn-on leads connected incorrectly remain energized whenever the vehicle sits.
Tracing the Problem Circuit
Once confirmed excess drain exists, isolate the offending circuit by pulling fuses sequentially. Keep the multimeter connected throughout. Remove one fuse at a time, watching for sudden amperage drops.
When drawing decreases significantly after removing a fuse, the circuit protected by that fuse contains the fault.
Replace the fuse temporarily to verify identification. Reinsert it and confirm draw returns to abnormal levels. This confirmation eliminates guesswork before component disconnection.
Common trouble spots include trunk lights with damaged switches, glove compartment lamps stuck on, and aftermarket stereos lacking proper sleep cycling.
Owners considering long-term storage should review our battery storage guidelines for additional protection strategies beyond parasite detection.
Dealing with Persistent Sleep Issues
Some vehicles refuse to enter sleep mode due to faulty modules. A malfunctioning Body Control Module, Gateway Module, or communication network error keeps systems awake indefinitely. These failures require professional diagnostic equipment to identify properly.
OBD-II scanners can read manufacturer-specific sleep status codes. Advanced scan tools monitor module communication patterns and report anomalies. When routine fuse-pulling reveals no single culprit, specialized diagnostics become necessary.
Dealer service departments or independent specialists with factory-level tools handle these cases most effectively.
What to Do Next: Fixes for Each Diagnosis
Your test results determine the appropriate remedy. Applying the wrong fix wastes money and delays resolution. Match your diagnosis to the corresponding action below.
Fixing Excessive Parasitic Draw
Once you identified the problematic circuit through fuse-pulling, trace wiring and components on that circuit. Inspect aftermarket installations for improper connections. Verify alarm system wiring follows manufacturer instructions with proper relay integration.
Check trunk and glove box light switches for sticking or damage.
Replace faulty switches, repair broken wires, and reinstall accessories according to specification. After correction, re-measure parasitic draw to confirm it falls within normal range. Clear any stored diagnostic codes triggered by the fault.
Road-test the vehicle to ensure all systems function correctly after repairs.
Repairing Charging System Defects
Alternator problems require different approaches based on severity. Minor issues like loose belts or corroded connections resolve quickly and inexpensively. Serpentine belt tension should follow manufacturer specification.
Belt slippage reduces alternator output proportionally.
Internal alternator faults involve component replacement. Worn brushes, failed diodes, or damaged regulators typically warrant complete alternator replacement rather than individual part repair. Remanufactured units offer cost-effective solutions matching original equipment performance.
Installation usually takes under an hour with basic hand tools.
Replacing Failed Batteries
When load testing confirms reduced capacity or repeated deep discharge damaged the battery, replacement becomes necessary. Select a battery matching original equipment specifications for group size, cold cranking amps, and reserve capacity. AGM batteries suit stop-start vehicles and those with high electrical demands.
Flooded batteries work adequately for basic applications on a budget.
Proper installation includes terminal cleaning, correct torque specification, and securing the battery firmly in its tray. Loose batteries suffer internal damage from vibration over time. Apply terminal protectant to prevent future corrosion buildup.
Restoring Deeply Discharged Batteries
Batteries sitting below 11.8 volts for extended periods may recover partially with smart charging. Connect a maintenance charger featuring desulfation or rebuild modes. These functions apply controlled pulse currents to break down hardened lead sulfate crystals.
Recovery success depends on damage severity and time spent deeply discharged.
Even recovered batteries show reduced capacity compared to fresh units. Perform load testing after recovery to confirm adequate performance. If the battery fails load testing post-recovery, replacement remains the safest option.
Continued use of a weakened battery risks unexpected failure at inconvenient times.
Common Mistakes That Lead to Wrong Fixes
Drivers frequently misdiagnose battery problems, leading to unnecessary part replacement and recurring failures. Avoiding these errors saves money and restores confidence in your diagnostic skills.
Skipping the Voltage Test
Jumping straight to battery replacement without measuring resting voltage assumes the battery caused the problem. The battery might be perfectly healthy while an alternator or parasitic drain creates the real issue. Testing costs nothing but time.
Replacement parts cost significant money. Always verify charge state before swapping components.
Using the Wrong Charger Type
Applying a standard trickle charger to AGM batteries causes overcharging and permanent damage. AGM batteries require specific voltage profiles during charging. Smart chargers automatically detect battery type and adjust output accordingly.
Using incorrect charging methods voids warranties and destroys otherwise serviceable batteries.
Read our terminal corrosion prevention guide to avoid another common maintenance oversight that compounds charging problems.
Ignoring Terminal Condition
Corroded or loose terminals create resistance that mimics battery weakness. Voltage drops across poor connections reduce effective cranking current. Cleaning terminals and tightening clamps to specification resolves many apparent battery problems instantly.
Torque values matter. Over-tightening damages terminals. Under-tightening allows arcing and accelerated corrosion.
Assuming All Aftermarket Draw Is Normal
Owner-installed accessories sometimes exceed designed parasitic limits. A sophisticated alarm system might draw 150 milliamps instead of the intended 50 milliamps due to wiring errors. Every added device warrants verification that it enters proper sleep mode and draws acceptable current.
Budget accessories cut corners on sleep circuitry design.
Diagnosing Before Drives Stabilize
Measuring parasitic draw immediately after shutting off the engine captures transient currents from刚刚-powered modules. Waiting for full sleep cycle completion prevents misjudgment. Some drivers pull fuses fruitlessly chasing phantom drains that resolve once modules properly sleep.
Allow adequate waiting time before concluding abnormal drain exists.
Overlooking Battery Age
A four-year-old battery showing marginal load test results often fails again within months regardless of other fixes. Age-related capacity loss compounds with any minor parasitic drain or charging deficiency. Replacing aged batteries preemptively eliminates recurring frustration.
Plan battery replacement every three to five years depending on usage and climate exposure.
Parts, Labor, and Replacement Costs
Understanding typical costs helps you decide whether to DIY or seek professional help. Budgeting accurately prevents surprise bills and lets you compare repair versus replacement scenarios objectively.
Diagnostic Service Costs
Most auto parts stores offer free battery load testing as a customer service. These tests verify capacity and identify weak cells without charge. Professional diagnostic labor at repair shops runs $75 to $150 per hour.
A complete parasitic draw diagnosis typically takes one to two hours depending on vehicle complexity.
Independent mechanics often charge less than dealership service departments. Mobile mechanics may add trip fees but eliminate towing costs if your vehicle won't start. Get written estimates before authorizing work to avoid billing surprises.
Component Replacement Expenses
Battery prices vary significantly by chemistry and specifications. Flooded lead-acid batteries cost $100 to $200 for standard 12-volt starting units. AGM batteries range from $150 to $300 depending on reserve capacity and cold cranking amps.
EFB batteries for stop-start systems fall between $150 and $250.
Alternator replacement runs $300 to $600 installed including parts and labor. Remanufactured units cost less than new OEM alternatives but deliver comparable performance. Belt replacements add $50 to $150 depending on whether you need just the belt or tensioner components as well.
Battery maintainer purchases range from $30 to $100 for quality smart chargers. These devices pay for themselves by preventing premature battery failure in frequently parked vehicles.
Cost Comparison Table
| Service or Part | Typical Cost Range | Notes |
|---|---|---|
| Battery load test | Free to $50 | Many auto parts stores provide complimentary testing |
| Alternator testing | $50 to $100 | Sometimes included with broader diagnostic fees |
| Parasitic draw diagnosis | $100 to $250 labor | Varies by vehicle access and circuit complexity |
| Flooded battery replacement | $100 to $200 | Average lifespan three to five years |
| AGM battery replacement | $150 to $300 | Better suited for high-demand electrical systems |
| Battery maintainer | $30 to $100 | Recommended for weekend or seasonal vehicles |
| Alternator replacement | $300 to $600 installed | Includes parts plus standard labor time |
Prices vary by region, vehicle make, and market conditions as of 2026. Local parts markup and labor rate differences affect final costs. Comparing multiple quotes ensures fair pricing.
Pro Tips from Mechanics Who See This Daily
Experienced technicians share practical lessons that separate quick fixes from lasting repairs. These insights come from thousands of diagnostics and real-world applications across diverse vehicle types.
Terminal Maintenance Matters More Than You Think
Cleaning corroded terminals with a baking soda solution restores conductivity instantly. Mixture of one tablespoon baking soda per cup water neutralizes acid buildup safely. Scrub with a wire brush until metal shines, then rinse thoroughly and dry completely.
Torque terminal clamps to manufacturer specification. Over-tightening stretches bolt threads and cracks cast terminal posts. Under-tightening allows arcing that accelerates corrosion cyclically.
Most manufacturers specify 80 to 120 inch-pounds for standard ring terminals.
Smart Chargers Outperform Basic Trickle Models
Old-style constant-voltage trickle chargers overcharge modern batteries during extended connection periods. Smart chargers detect battery state automatically and switch between bulk, absorption, and float stages appropriately. This prevents water loss in flooded batteries and thermal damage to AGM types.
For vehicles parked weekly or longer, connect a maintenance charger set to 1.5 to 3 amps. This current level counters self-discharge without generating excessive heat. Battery manufacturers recommend this practice explicitly for stored vehicles.
Consider checking our battery lifespan factors guide to understand how maintenance choices extend service life.
Memory Preservation During Replacement
Modern vehicles store adaptation values, radio codes, and module configurations in volatile memory. Disconnecting the battery erases these settings temporarily. Use a maintenance memory device plugged into the OBD-II port or cigarette lighter socket during battery service.
These devices cost under $20 and prevent frustrating reprogramming requirements afterward. Some vehicles require dealer-level initialization procedures for certain modules after power interruption. Checking service information beforehand saves time and money.
Conductance Testing Catches Hidden Weaknesses
Traditional load tests measure voltage under artificial drain but miss internal resistance changes indicating early failure. Conductance testers apply high-frequency signals to measure plate surface condition directly. These devices detect sulfation and grid corrosion before voltage-based tests reveal problems.
Ask your service provider to perform conductance testing alongside load testing when evaluating questionable batteries. The combination provides comprehensive health assessment beyond simple capacity checks.
Document Your Baseline Readings
Record resting voltage, parasitic draw, and alternator output during each service visit. Tracking these numbers over time reveals degradation patterns before sudden failure occurs. Comparing current readings to historical baselines highlights problems early.
Simple notebook entries or smartphone notes create valuable diagnostic history. When a no-start complaint arrives, having previous measurements accelerates troubleshooting dramatically.
Safety Rules When Testing or Replacing Batteries
Working with automotive batteries carries genuine hazards requiring strict precautions. Lead-acid batteries contain sulfuric acid and generate explosive hydrogen gas during charging. Following established safety protocols prevents serious injury.
Personal Protective Equipment Requirements
Always wear ANSI-approved safety glasses when working near batteries. Sulfuric acid splashes cause permanent eye damage instantly. Heavy leather or nitrile gloves protect hands from acid contact and pinch points.
Remove all metallic jewelry before beginning work. Rings, watches, and bracelets conduct electricity and can weld to battery terminals during accidental contact. Steel-toe boots protect feet from falling battery cases weighing 40 pounds or more.
Working Environment Preparation
Perform battery service in well-ventilated areas. Hydrogen gas released during charging accumulates in enclosed spaces and explodes readily. Open garage doors or outdoor workspaces prevent dangerous gas concentration.
Keep spark sources away from battery locations. No smoking, no open flames, no grinding tools operating nearby during battery disconnect or connection procedures. Even static discharge from clothing can ignite accumulated hydrogen.
Correct Disconnect and Connect Sequence
Always disconnect the negative cable first. This sequence prevents accidental short circuits when removing the negative terminal since the positive remains isolated by engine block grounding. Keep wrenches and tools away from grounded metal while loosening negative clamps.
Reconnect the positive cable first, then the negative. This reverses the danger sequence during installation. Tighten clamps securely but avoid forcing bolts beyond specification.
Cross-threaded terminal posts require complete replacement rather than repair.
Emergency Response Procedures
Sulfuric acid contact with skin requires immediate rinsing with copious water for at least fifteen minutes. Remove contaminated clothing while rinsing. Seek medical attention for any acid exposure exceeding minor splashes.
Hydrogen ignition incidents cause violent explosions releasing acid spray in all directions. If you hear cracking sounds near a charging battery, stop charging immediately and evacuate the area. Never attempt to extinguish a battery fire with water alone.
Use Class D or standard ABC fire extinguishers designed for electrical hazards.
Review our comprehensive battery safety precautions for detailed emergency procedures and first aid guidance.
Proper Disposal and Recycling
Used batteries contain lead and sulfuric acid classified as hazardous waste. Never dispose of automotive batteries in regular trash containers. Local regulations prohibit landfill burial of lead-acid cells.
Auto parts stores accept old batteries for recycling upon new purchase usually offering core charges or credits. Municipal household hazardous waste facilities accept used batteries year-round. Dedicated recyclers recover nearly 99 percent of lead and plastic content from spent batteries responsibly.

Maintenance Routine to Prevent Future Dead Batteries
Consistent maintenance habits prevent most overnight battery deaths before they occur. Establishing a simple routine saves towing fees, replacement costs, and inconvenience far exceeding any preventive expense.
Weekly Driving Requirements
Drive your vehicle at least once weekly for twenty to thirty minutes minimum. Highway speeds above fifty miles per hour allow the alternator to fully recharge the battery while powering accessories simultaneously. City driving with frequent stops rarely provides sufficient recharge time between cycles.
If weekly driving proves impossible, invest in a quality battery maintainer instead. Smart maintainers connect permanently and pulse-charge as needed without overcharging risk. This approach replicates regular driving benefits for stationary vehicles.
Consider reviewing our maintenance tips article for additional seasonal care recommendations beyond routine driving.
Monthly Voltage Monitoring
Measure resting battery voltage monthly using a digital multimeter. Record readings in a simple log book or phone note application. Compare each measurement against previous results to detect gradual capacity loss early.
Voltage dropping below 12.4 volts during monthly checks indicates emerging problems worth investigating promptly. Do not wait for complete failure. Addressing weak charging or increasing parasitic drain early prevents stranded situations.
Seasonal Preparation Steps
Before winter deployment, verify battery holds adequate charge and terminals show clean connections. Cold weather amplifies existing weaknesses dramatically. A battery sitting at 75 percent charge in freezing temperatures may lack sufficient cranking amps to start reliably.
Spring cleaning involves washing terminal corrosion completely, tightening clamp fasteners, and verifying maintainer operation if equipped. Check battery case for swelling or cracking indicating internal damage from overcharging or extreme heat exposure.
Long-Term Storage Procedures
Vehicles stored thirty days or longer require special preparation. Connect a smart maintainer set to maintenance mode ideally. If maintainer unavailable, disconnect the negative cable entirely to eliminate all parasitic drain paths.
Store batteries in cool, dry locations if removed from vehicles. Temperature extremes accelerate degradation whether charging or idle. Full charge before storage prevents sulfation during dormant periods.
Checking proper battery storage techniques ensures long-term preservation when vehicles remain unused for months at a time.
Terminal Protection Application
Apply dielectric grease or dedicated terminal protectant spray after cleaning and tightening connections. These products repel moisture and inhibit corrosion formation without interfering with electrical conductivity. Reapply annually or after thorough terminal cleaning sessions.
Replace severely corroded terminals rather than attempting restoration. Thin metal walls crack under clamp pressure causing intermittent connection failures difficult to diagnose later.
Real-Life Cases: How Drivers Solved the Problem
Specific examples illustrate how systematic diagnosis leads to correct solutions. These cases demonstrate pattern recognition skills developed through repeated similar complaints.
Case One: Weekend Sports Car in Cold Climate
A 2018 sports coupe sat unused November through March in unheated garage. Owner reported dead battery every spring startup despite new battery installation the previous September. Resting voltage measured 11.7 volts after January parking.
Parasitic draw test revealed 180 milliamps flowing continuously. Fuse pulling identified rear audio amplifier circuit as culprit. Aftermarket installers tapped constant power without proper sleep switching.
New relay installation reduced draw to 35 milliamps. Battery now survives entire winter storage without maintainer assistance.
Total repair cost under $40 including relay and wiring materials. New battery purchase prevented entirely through correct diagnosis.
Case Two: Commuter Minivan with Chronic Undercharge
Daily twelve-mile round trip commuter replaced identical batteries twice within fourteen months. Both failures occurred after four-day weekend parking spells. Third battery testing showed 62 percent rated capacity at twenty-eight months age.
Alternator output measured only 13.1 volts under full electrical load. Belt showed glazing and tension insufficient per specification. New belt installation restored 14.2 volt charging.
Fourth battery lasted thirty-eight months before replacement ultimately required due to accumulated deep discharge damage from prior years.
Proper charging system maintenance extended battery service life threefold compared to prior neglect cycle.
Case Three: Luxury SUV with Ghost Parasitic Drain
Forty-five-minute fuse-pulling routine failed to isolate drain source on premium crossover. All factory fuses produced minimal draw change. Afternoon research revealed known issue with third-row entertainment system gateway module failing to sleep properly.
Module replacement cost $320 parts plus one hour labor. Dealer warranty covered part under extended service plan. Previous independent shop diagnoses blamed batteries repeatedly totaling $600 in unnecessary replacements before correct identification.
Complex modern vehicles sometimes require manufacturer-specific diagnostic procedures beyond basic fuse testing. Knowing when to escalate to specialized equipment prevents wasted effort.
Case Four: Classic Car Battery Tender Discovery
Seventeen-year-old muscle car sat fifty-three days between drives seasonally. Owner connected inexpensive trickle charger claiming "constant charging prevents death." Battery measured 10.9 volts after six weeks anyway.
Smart charger replacement with automatic voltage monitoring restored battery to full capacity within eight hours. Subsequent monthly voltage checks showed stable 12.6 volt retention throughout extended storage periods. Proper maintenance equipment made dramatic difference versus naive constant-voltage approach.
Matching charger technology to battery chemistry and usage pattern proved essential for success.
FAQs About Batteries Dying While Parked
How long can a car sit before the battery dies?
A healthy battery typically survives two to four weeks parked under normal conditions. Cold weather shortens this window dramatically, sometimes killing a battery in just three to five days. Hot climates accelerate self-discharge and internal degradation, reducing safe parking time to one to two weeks for older batteries.
Vehicles with high parasitic draw may lose charge in less than forty-eight hours regardless of temperature.
If you know your vehicle will sit longer than ten days, connect a smart battery maintainer immediately. The $30 to $80 investment prevents towing fees and premature battery replacement costs repeatedly.
Can a bad alternator kill a new battery?
Yes, absolutely. A weak alternator chronically undercharges any battery connected to it. New batteries subjected to persistent undercharging develop sulfation faster than they would through normal aging.
The chemical crystals grow large and hard, permanently reducing plate surface area available for reactions.
Most drivers blame the battery when the alternator caused the original problem. Always test charging system output before replacing a battery showing premature failure. If voltage stays below 13.5 volts under load, replace or rebuild the alternator first.
Then install the new battery and verify proper charging before considering warranty claims.
Is a battery maintainer worth buying?
For vehicles driven less than twice weekly, a smart maintainer is highly recommended by nearly every manufacturer. These devices monitor voltage continuously and apply charge only when needed. They prevent the sulfation damage that occurs from sustained low state of charge.
Basic trickle chargers lack automatic shut-off and overcharge modern batteries reliably. Smart maintainers use microprocessor control to switch between bulk, absorption, and float modes automatically. The upfront cost pays for itself within the first year by extending battery life two to three times beyond neglect.
Consider reviewing our battery maintenance tips for additional strategies beyond simple maintainer use.
Why does my battery die overnight even with no accessories on?
Modern vehicles keep dozens of modules in low-power sleep mode constantly. Engine control units, body control modules, radio memory circuits, and keyless entry receivers all draw small currents permanently. Factory designs keep total sleep draw between 20 and 50 milliamps normally.
When death occurs overnight instead of over days, something prevents normal sleep cycling. Faulty modules stuck in active mode, relay coils failing to release, or aftermarket installations wired incorrectly create abnormal drain paths. Even quality accessories can disrupt sleep patterns if not installed following manufacturer specifications precisely.
Run the parasitic draw test described earlier to confirm whether draw exceeds normal thresholds before assuming component failure.
Can I revive a deeply discharged battery?
Sometimes recovery succeeds if the battery spent less than forty-eight hours below 11.0 volts. Smart chargers with desulfation modes apply controlled pulse currents that break down lead sulfate crystals gradually. Recovery typically requires six to twenty-four hours depending on severity.
Batteries sitting below 10.5 volts for several days rarely recover fully. Internal plate damage from extended deep discharge proves permanent regardless of charging attempts. Perform a load test after any recovery attempt to confirm adequate capacity remains.
If voltage drops below 9.6 volts during a fifteen-second load test, replacement remains the only reliable option.
How do I know if I need professional help versus DIY diagnosis?
Try DIY testing if you own a basic digital multimeter and feel comfortable working under the hood. The resting voltage test and alternator output check require minimal tools and provide immediate diagnostic clarity for most cases. Parasitic draw testing adds one additional step requiring series current measurement.
Seek professional assistance if fuse-pulling reveals no isolated circuit, if alternator testing confirms fault but repair seems complex, or if you lack appropriate diagnostic equipment for module sleep analysis. Dealers and independent specialists possess factory scan tools capable of reading manufacturer-specific sleep status codes and communication network anomalies.
Our battery compatibility guide helps ensure any replacement matches your vehicle requirements correctly.
Final Decision Guide: DIY vs. Professional Help
Knowing when to handle diagnostics yourself versus when to call a professional saves money and prevents misdiagnosis frustration. Use this decision framework based on your situation and capabilities.
Try DIY Testing If
You have a digital multimeter costing $15 to $40 and basic hand tools. The resting voltage test takes five minutes and tells you immediately whether the battery holds charge adequately. Alternator output checking requires two probe points and thirty seconds of measurement time.
You can access the fuse box easily and understand basic automotive fuse layouts. Most vehicles label individual fuse positions clearly on the cover or in the owner manual. Fuse-pulling identification takes fifteen to thirty minutes for straightforward parasitic drain cases.
You prefer learning hands-on diagnostic skills for future independence. Each successful diagnosis builds confidence and pattern recognition useful across multiple vehicles. Documenting your findings creates personal reference material for subsequent issues.
Review our battery testing methods guide for detailed procedural steps supporting independent diagnosis.
Seek Professional Help If
Fuse-pulling fails to isolate any single circuit causing excessive draw. Complex modern vehicles route control signals across multiple networks making simple amperage tracing insufficient. Manufacturer-specific diagnostic procedures require proprietary scan tools unavailable to general consumers.
Alternator testing reveals internal diode failure or regulator problems needing specialized replacement procedures. Some vehicles require battery registration procedures after replacement to configure charging system parameters correctly. Incorrect programming causes chronic overcharging or undercharging regardless of part quality.
You value time efficiency over learning diagnostic processes personally. Professional technicians complete comprehensive electrical system evaluation in one visit typically. Their experience recognizes failure patterns instantly without systematic elimination trial-and-error.
Replace the Battery If
Load testing confirms capacity below 70 percent of rated specification. Battery age exceeds four years with regular short-trip usage patterns. Resting voltage won't sustain above 12.2 volts after complete smart charger recovery attempt.
Visible terminal damage, case swelling, or electrolyte leakage indicates physical deterioration beyond repair.
Use our battery installation steps guide to ensure proper replacement procedure followed correctly.
Repair the Charging System If
Alternator output measures below 13.5 volts under applied electrical load. Dashboard battery warning illuminates intermittently or continuously during operation. Belt shows glazing, cracking, or improper tension per manufacturer specification.
Voltage spikes above 15.0 volts indicate regulator failure risking simultaneous battery and electronics damage.
Always address charging system faults before installing replacement batteries. New batteries subjected to chronic undercharging fail prematurely repeating the same symptom cycle indefinitely. Proper charging restoration extends new battery service life to full expected duration.
Check our terminal corrosion article for prevention strategies protecting new connections after completion.
Responsible Disposal Matters Too
Old batteries contain lead and sulfuric acid requiring proper recycling handling. Auto parts stores accept core exchanges typically applying credit toward new purchase prices. Municipal hazardous waste facilities accept standalone used batteries without purchase requirement.
Never dispose automotive batteries in trash containers or attempt acid neutralization DIY methods. Improper disposal harms environment and violates local regulations almost universally. Lead recovery rates exceed 99 percent through certified recycling channels economically viable consistently.
Learn about battery recycling processes to understand material recovery benefits supporting circular economy principles.

Tony Kilmer is an auto mechanic and the author behind CarTruckAdvisor.com. He shares practical, no-nonsense guidance on car and truck maintenance, common problems, and repair decisions—helping drivers understand what’s going on and what to do next.