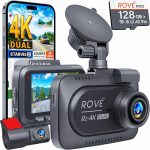
You have just purchased a new dash cam to protect yourself on the road, but the dangling power cord snaking across your windshield and plugging into your cigarette lighter is already driving you crazy. It blocks your view, clutters your dashboard, and makes your car look like a mobile surveillance van. The good news is that there is a cleaner, more professional solution: hard wiring your dash cam directly into your vehicle’s electrical system.
Hard wiring a dash cam is not only possible, but it is also one of the most popular upgrades drivers make in 2026. This guide will walk you through everything you need to know about the process, from the tools required and safety precautions to the benefits of a permanent installation. By the end, you will understand exactly how to achieve a seamless, always-on dash cam setup that enhances both safety and aesthetics.
What Does Hard Wiring a Dash Cam Actually Mean?
Hard wiring a dash cam refers to the process of connecting the device directly to your vehicle’s electrical system, typically through the fuse box, rather than plugging it into the 12V accessory port (cigarette lighter). This method creates a permanent, hidden power source that runs behind your headliner and down the A-pillar, leaving no visible wires. The dash cam receives power whenever the ignition is on, and with the right kit, it can even run in parking mode when the engine is off.
The component you will need is a hard wire kit, which is a small adapter that steps down your car’s 12t power to the 5 volts required by most dash cams. This kit usually includes a fuse tap, a ground connector, and a voltage regulator. Without this kit, connecting a dash cam directly to a 12-volt source would instantly fry the device. In 2026, most reputable dash cam brands include or sell a compatible hard wire kit, making the process more accessible than ever.
The key distinction to understand is that hard wiring is not the same as simply tucking the wire under the trim. While hiding the cable is a cosmetic improvement, hard wiring actually changes the power source. This allows you to free up your 12V port other devices, eliminates the risk of the plug being knocked loose, and enables advanced features like parking mode surveillance, which requires constant power even when the car is parked and locked.
The Essential Tools and Components You Will Need
Before you begin, gathering the right tools and components is critical for a safe and successful installation. The most important item is the hard wire kit specific to your dash cam model. These kits are inexpensive, typically costing between $10 and $25, and include a fuse tap, a voltage regulator box, and a length of wire with a coaxial or USB connector. Do not attempt to use a generic 12V-to-5V adapter from a phone charger, as it may not provide stable power or fit the dash cam’s connector.
You will also need a basic automotive tools. A multimeter is essential for testing which fuses in your fuse box are switched (only on when the ignition is on) and which are constant (always on). A fuse puller or a pair of needle-nose pliers will help you remove fuses safely. Additionally, you will need a trim removal tool set to pry off plastic panels without scratching them, a wire stripper or cutter, and electrical tape or zip ties for securing the wiring. A 10mm socket or wrench is often needed to loosen the ground bolt.
Finally, you must identify the correct fuses to tap. Most vehicles have two fuse boxes: one under the hood and one inside the cabin, usually under the dashboard or glove box. For a dash cam, you will almost always use the interior fuse box. Common choices for the switched power source include the cigarette lighter fuse or the windshield wiper fuse. For the constant power source (if using parking mode), you might tap the interior light fuse or the door lock fuse. Always consult your vehicle’s owner’s manual to confirm fuse locations and amperage ratings.
Key Takeaways
- ✓ Hard wiring connects your dash cam directly to the vehicle’s fuse box, eliminating visible cords and freeing up the 12V port.
- ✓ You must use a dedicated hard wire kit with a voltage regulator to safely step down 12V to 5V.
- ✓ Always disconnect the car battery before starting the installation to prevent electrical shorts or airbag deployment.
- ✓ Parking mode requires tapping both a switched fuse (for ignition-on power) and a constant fuse (for always-on power).
- ✓ If you are uncomfortable with electrical work or drive a luxury vehicle, professional installation is worth the cost to avoid damage.
Frequently Asked Questions
Will hard wiring my dash cam void my car’s warranty?
In most cases, no, as long as you use a fuse tap and do not cut or splice into the factory wiring harness. However, if you damage a component or cause an electrical issue, the dealership may deny a related warranty claim. For leased vehicles or high-end cars, it is safest to use a professional installer who can provide a warranty on their work.
Can I hard wire a dash cam to any car, including electric vehicles (EVs)?
Yes, you can hard wire a dash cam to an EV, but the process is slightly different. EVs have a 12-volt auxiliary battery (not the main traction battery) that powers accessories. You tap into this battery’s fuse box just like in a gas car. Be extra cautious with the low-voltage cutoff setting, as draining the 12V battery in an EV can the car from starting or engaging the main drive system.
How do I know if my hard wire kit has a low-voltage cutoff?
Most quality hard wire kits sold in 2026 include a low-voltage cutoff feature. Check the product description or the small box on the kit itself. It will often have a small dial or a set of DIP switches to adjust the cutoff voltage (e.g., 11.8V, 12.0V, 12.2V). If your kit does not have this feature, you risk draining your car battery dead if you use parking mode for extended periods.
What is the difference between a fuse tap and an add-a-circuit?
They are the same thing. The terms “fuse tap” and “add-a-circuit” are used interchangeably. Both refer to a small plastic device that plugs into a fuse slot and provides two fuse positions: one for original circuit and one for your new device (the dash cam). This allows you to add a new circuit without removing the original fuse.
Can I hard wire a dash cam myself if I have no experience with car electronics?
It is possible, but it requires careful and patience. Start by watching detailed video tutorials for your specific car model. If you are comfortable using a multimeter and following instructions, the task is manageable. However, if you are unsure about identifying fuses or routing wires near airbags, it is better to pay a professional. The cost is usually between $50 and $150, which is a small price for peace of mind and safety.
Conclusion
Hard wiring a dash cam is a practical upgrade that transforms a cluttered, temporary setup into a permanent, professional-grade safety system. By connecting directly to your vehicle’s fuse box, you eliminate unsightly wires, free up your accessory port, and unlock powerful features like 24/7 parking surveillance. While the process requires some basic tools and electrical knowledge, it is a weekend project that most DIY enthusiasts can complete successfully.
As you move forward, remember to prioritize safety by disconnecting the battery and using the correct fuse tap. If you ever feel uncertain, do not hesitate to consult a professional installer. In 2026, with the rise of smarter dash cams and more affordable hard wire kits, there has never been a better time to make the switch. Take the plunge, clean up your windshield, and drive with the confidence that your dash cam is always ready, always powered, and always watching.

Tony Kilmer is an auto mechanic and the author behind CarTruckAdvisor.com. He shares practical, no-nonsense guidance on car and truck maintenance, common problems, and repair decisions—helping drivers understand what’s going on and what to do next.