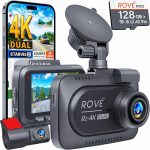
You have just purchased a brand new dual-channel dash cam system, and you are eager to get it set up. You carefully mount the front camera on the windshield, route the cable along the headliner, and then you stop. You stare at the rear window of your car and ask yourself a critical question: where exactly should I install the rear dash cam? This single decision can mean the difference between crystal-clear footage that captures license plates and useless video that shows nothing but sky or your car’s interior.
In 2026, dash cams are more sophisticated than ever, with 4K resolution, wide dynamic range, and parking mode capabilities. However, even the best camera will fail if it is installed in the wrong location. This guide will walk you through the five best placement options for your rear dash cam, explain the pros and cons of each, and provide actionable installation tips. Whether you drive a sedan, SUV, truck, or hatchback, you will leave this article with the confidence to install your camera perfectly on the first try.
The Gold Standard: Center-Mounted on the Rear Windshield
The most recommended and universally effective location for a rear dash cam is the center of the rear windshield, just below the top edge. This position mirrors the ideal placement of your front camera. By mounting the camera in the center, you achieve a perfectly balanced field of view that captures both lanes of traffic behind you, the road directly behind your vehicle, and the horizon. This is the location used by professional installers and is the default recommendation for 90% of vehicles.
Why does the center work so well? First, it eliminates blind spots on either side of your vehicle. If you mount the camera too far to the left or right, the A-pillar or C-pillar of your car will block a significant portion of the view. Second, the center position allows the camera to capture the full width of the road, which is critical for recording hit-and-run drivers, aggressive tailgaters, or lane-changing incidents. For example, if someone rear-ends you at a stoplight, a center-mounted camera will capture their approach, the impact, and their subsequent actions without obstruction.
However, there is one major caveat: your rear windshield defroster lines. Most modern cars have horizontal or vertical heating elements embedded in the glass. While a dash cam can be mounted over these lines, the adhesive may weaken over time due to the heat cycles. To mitigate this, use a static cling mount or a high-quality 3M VHB adhesive pad designed for automotive use. Avoid mounting the camera directly on the defroster grid if you frequently use the rear defroster in winter, as the heat can cause the adhesive to fail and the camera to fall.
The Hatchback and SUV Solution: Mounting on the Liftgate Glass
If you drive a hatchback, SUV, minivan, or station wagon, the center of the rear windshield presents a unique problem. When you open the liftgate or trunk, the glass tilts upward. If your rear dash cam is mounted on this moving glass, the cable connecting it to the front camera will be stretched, pinched, or broken every time you open the rear door. This is the single most common installation mistake owners of these vehicles make.
The solution is to mount the rear dash cam on the liftgate glass itself, but with a critical modification to the cable routing. Instead of running the cable directly from the camera to the headliner, you must create a service loop. This means leaving several inches of slack cable at the point where the liftgate hinge meets the roof. When the liftgate opens, the slack loop absorbs the movement, preventing tension on the connectors. You can hide this loop inside the rubber boot that protects the wiring harness between the car body and the liftgate.
For vehicles with a rear wiper, be mindful of the wiper’s arc. Mount the camera above or to the side of the wiper’s sweep path. If the wiper blade constantly rubs against the camera lens, it will scratch the glass or leave smudges that ruin your footage. A practical tip is to test the wiper operation before finalizing the mount. Turn on the rear wiper and watch where it travels. Then, mount your camera at least two inches outside that path. This ensures your lens stays clean and your footage remains clear.
The Premium Alternative: Exterior Mounting on the License Plate or Spoiler
For drivers who want the absolute best field of view and do not want to deal with rear window obstructions, an exterior-mounted rear dash cam is the premium choice in 2026. cameras are typically small, weatherproof units that attach to your license plate frame, rear bumper, or spoiler. They connect to the main dash cam unit via a waterproof cable that runs through your trunk seal. This setup is popular among owners of pickup trucks with camper shells, vans with no rear windows, and sports cars with heavily tinted glass.
The primary advantage of exterior mounting is that the camera is completely unobstructed. There is no glass glare, no tint film degradation, and no defroster lines to interfere with the image. The camera sits at bumper height, which is ideal for capturing license plates of vehicles directly behind you. In a rear-end collision, the camera is positioned at the exact impact zone, providing undeniable evidence of fault. Many modern exterior cameras also include infrared LEDs for clear night vision.
However, this installation is not for the faint of heart. It requires drilling holes for the mounting bracket or using heavy-duty adhesive that can withstand rain, snow, and car washes. You must also ensure the cable entry point is properly sealed with silicone or a grommet to prevent water leaks into your trunk. Additionally, exterior cameras are more vulnerable to theft and vandalism. If you choose this route, invest in a camera with a tamper-proof mounting system and consider a model that integrates with your vehicle’s existing license plate light housing for a stealthy look.
The Stealth Option: Inside the Rear Window (Third Brake Light Area)
Many drivers dislike the look of a camera stuck to their rear glass. If aesthetics are a priority, or if your rear window is heavily tinted, the best location is inside the vehicle, mounted on the rear deck or the headliner near the third brake light. This location is particularly effective in sedans and coupes where the rear shelf is flat and unobstructed. The camera sits just below the rear window, looking out through the glass, but is nearly invisible from outside the vehicle.
The key to success with this placement is height. You want the camera lens to be as high as possible to see over the rear headrests. If your rear headrests are tall and block the view, you have two options. First, you can remove the headrests when you are not carrying passengers. Second, you can mount the camera on the rear glass itself, but at the very top edge, just below the headliner. This gives you a downward angle that sees over the headrests. Many 2026 dash cams now feature adjustable lens angles of 160 degrees or more, which helps compensate for a slightly lower mounting position.
One common issue with this location is glare from the rear window. When sunlight hits the glass at a low angle, it can wash out the footage. To combat this, use a dash cam with a polarized lens filter or a high dynamic range (HDR) mode. You can also apply a thin strip of anti-glare window tint to the area directly in front of the camera lens. This reduces reflections without significantly darkening the video. Test your setup at different times of day to ensure the footage remains usable in all lighting conditions.
Special Considerations for Trucks, Vans, and Convertibles
Not every vehicle has a traditional rear window. For pickup trucks with an open bed, the best location is on the rear of the cab, above the rear window, using an exterior camera. Many truck owners mount the camera to the third brake light housing or the roof cap. For vans and cargo vehicles with no rear visibility, you may need to install the camera on the rear doors or the bumper. In these cases, a wireless rear camera system is often easier to install than a wired one, though wired systems offer more reliable video quality.
Convertibles present a unique challenge because the rear window is often made of soft plastic and folds down with the roof. You cannot mount a camera to a folding plastic window. Instead, mount the camera on the roll bar, the rear bulkhead, or the interior trim behind the seats. This location is fixed and will not move when the top is down. Be aware that the camera will be exposed to the elements when the top is down, so choose a weather-resistant model or remove the camera when parking with the top open.
For all vehicle types, always consider the cable routing before finalizing the mount. The cable must reach from the rear camera to the front unit without being pinched by seat tracks, door hinges, or trunk mechanisms. Use a plastic trim removal tool to tuck the cable under the headliner, along the door sills, and under the carpet. Avoid running cables across the floor where they can be kicked or caught in pedals. A clean, hidden installation not only looks professional but also ensures the cable will not be damaged over time.
Key Takeaways
- ✓ The center of the rear windshield, just below the top edge, is the best location for most vehicles, providing a balanced and unobstructed view.
- ✓ For hatchbacks and SUVs, mount the camera on the liftgate glass and create a service loop in the cable to prevent damage when opening the rear door.
- ✓ Exterior mounting on the license plate or bumper offers the clearest view but requires waterproofing and is more vulnerable to theft.
- ✓ Inside the rear window near the third brake light is a stealthy option that works well in sedans, but watch for glare and headrest obstruction.
- ✓ Always test your camera’s field of view and cable routing before finalizing the installation to avoid pinched wires or blocked lenses.
Frequently Asked Questions
Can I install a rear dash cam on a tinted rear window?
Yes, but with caution. If the tint is very dark (below 20% VLT), the camera may struggle to capture clear footage at night. Mount the camera on the glass itself, not on the tint film, as the adhesive can cause the tint to bubble or peel. For best results, use a camera with a wide aperture (f/1.8 or lower) and WDR (Wide Dynamic Range) to compensate for the reduced light.
What if my rear window has a built-in sunshade or privacy cover?
You have two options. First, you can mount the camera below the sunshade, on the rear deck. Second, you can cut a small slit in the sunshade for the camera lens to poke through. The second option is more permanent but provides a clear view. If you frequently use the sunshade, consider an exterior-mounted camera to avoid the conflict entirely.
How do I hide the cable from the rear camera to the front of the car?
Use a plastic trim tool to tuck the cable under the headliner, along the rubber door seals, and under the A-pillar trim. For the rear section, run the cable along the edge of the rear window, down the C-pillar, and under the rear seat. Avoid running cables across the floor or through the center console, as they can be damaged or interfere with driving.
Is it better to hardwire the rear camera or use the cigarette lighter?
Hardwiring is always better for a permanent installation. It keeps the cable completely hidden, frees up your 12V port, and allows the camera to use parking mode. If you are not comfortable hardwiring, use a cigarette lighter adapter with a right-angle plug to keep the cable tidy. For 2026, many dash cams come with a hardwire kit that includes a voltage cutoff to protect your car battery.
My rear dash cam keeps falling off the glass in hot weather. What can I do?
Heat is the enemy of adhesive mounts. First, clean the glass with isopropyl alcohol before mounting. Second, use a high-temperature adhesive pad rated for automotive use (3M VHB is the industry standard). Third, consider using a static cling mount that adheres via static electricity rather than glue. If the problem persists, switch to a suction cup mount, which can be re-wetted and re-applied as needed.
Conclusion
Choosing where to install your rear dash cam is a decision that directly impacts the quality and reliability of your video evidence. The center of the rear windshield remains the gold standard for most vehicles, but hatchback owners, truck drivers, and convertible enthusiasts have excellent alternatives that work just as well. By considering your vehicle type, your aesthetic preferences, and your willingness to run cables, you can select the perfect location for your setup.
Now that you have this comprehensive guide, it is time to take action. Gather your tools, clean your mounting surface, and test your chosen location before committing to the adhesive. Remember, a properly installed rear dash cam is an investment in your safety and peace of mind. In 2026, with more distracted drivers on the road than ever, having clear, unobstructed rear footage could be the difference between a fair insurance settlement and a costly legal battle. Install it right the first time, and drive with confidence.

Tony Kilmer is an auto mechanic and the author behind CarTruckAdvisor.com. He shares practical, no-nonsense guidance on car and truck maintenance, common problems, and repair decisions—helping drivers understand what’s going on and what to do next.